Reaktor Tutorials, Reverb
How to Create Reverb in Reaktor, Part I
In this tutorial series, I’ll explain how reverb works and start to create a reverb macro in Reaktor. Many of the basic, freely available reverb algorithms require the creation of custom filter types, and as such, readers of this series are expected to be familiar with at least the first few tutorials in our series on filter design in Reaktor.
I will warn you in advance that designing and implementing high-quality reverb algorithms is not easy. The algorithms we will be starting with are old, and have several flaws. Nonetheless, I think it is an important starting point for learning, if you are interested in designing custom reverbs.
WHAT IS REVERB?
Let’s first get a simple understanding of the real-world effect we are trying to mimic. Reverb is easiest to hear and understand in the context of enclosed spaces. Imagine you snap your fingers from the center of a small room. Sound waves emanating from your fingers will travel in all directions until they hit a wall or another barrier.
When a sound wave reflects off of a surface, some of it’s energy is absorbed, depending on the type of material the surface is made of. Soft materials aborb more of a signal than harder materials, and more of the high frequencies in particular.
The first few milliseconds after a sound is made, very few, if any, echoes are arriving at the ears of the listener. This time period is often implemented in reverbs as a “Pre-delay” knob. How long the echoes take, and their density (the frequency of their arrival) is dictated by the position of the sound source, the position of the listener, and the size and shape of the room.
It is tempting to simply calculate the time it would take for individual echoes to reach the ears of the listener, implement delay lines for each, and simply add all of the echoes together. This technique is called raytracing, and it is also an early 3D graphics technology, I believe it was used in the original Wolfenstein.
However, in practice, this is far more expensive for audio than it it is for visual data, and it is not really worth the amount of CPU this method would require.
SCHROEDER REVERBS
The earliest attempts at creating artificial reverb that I know of were made by Manfred Schroeder, almost 50 years ago. A fantastic resource on these can be found here, by Julius O. Smith. I’ll be working off of this page for the remainder of this tutorial.
Let’s take a look at implementing the three components that make up this graph (the All Pass filters, the Feedback Comb Filters (FBFCs), and the Mixing Matrix. Let’s start with the All Pass filter. Smith provides the following image:
Here, M1, M2 and M3 are delay times, in samples, and ‘g’ is generally considered to 0.7. Notice that this picture really is a single struture repeated three times. Let’s simply implement one of these and copy it three times.
This is not so hard to implement. I used a System Info module to help translate the ‘M’ input (which is in samples) to milliseconds, which the Single Delay module takes as an input.
If I understand correctly, this all pass filter functions as a sort of frequency-dependant delay.
Looking at the transfer function of the Feedback Comb Filters, we can see that they are essentially the same structure as the all pass filter, with the feedforward section removed. This is a simple edit:
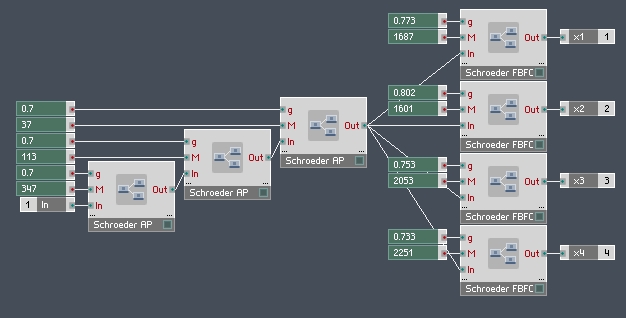
The only thing left to implement is the mixing matrix. The All Pass filers and the FBFCs can be wired up like so to match the diagram from Smith’s page:
And finally, adding in the mixer, which Smith notes can be reduced to 4 adds and 2 negations:
I’m not sure exactly why the structure has four outputs, but I tried a few combinations of choosing two of the four to be the left and right outputs. Some work better than others – using a negative version of a signal as one output and the positive version as the other seems to be the worst combination. I have also found that the input or output should be attenuated to eliminate bad distortion. It is also possible I’ve made an error somewhere causing this problem.
CONCLUSION
Today we covered a very basic reverb unit. It lacks many things, most of all, any form of tweakability for the user – there are no knobs! Nonetheless, the basic idea of reverb has been stated and a simple implementation shown. In the coming tutorials, I’ll find some more advanced algorithms to implement.


 YOUTUBE