$0.00 0

YOUR CART
Checkout

SUBTOTAL
DISCOUNT
VAT
TOTAL
Checkout
Banner
This tutorial series aims to teach the reader the basics of making a variety of effects in...

Reaktor Tutorials

Building Effects, Part I - How To Build Flangers and Phasers in Reaktor

This tutorial series aims to teach the reader the basics of making a variety of effects in Reaktor. I will focus on keeping the effects simple and easy to understand (please keep in mind that there is plenty of room for improvement!), but I will assume basic knowledge of Reaktor Primary modules.

This first tutorial focuses on building flangers and phasers.

FLANGER

A basic flanger in Reaktor can be made with just a few modules. To begin with, we need an idea of what a flanger does to an audio source.

Simply speaking, a flanger mixes an audio source with a delayed version of itself. The length of the delay is modulated by an LFO. This is a simple enough Reaktor structure to make:

However, this setup only gives us a very poor, weak flanging sound, as there is one component still missing – feedback! The output of the delay line must feedback into itself to give a fuller, more powerful flanging effect.

This, too, is pretty easy to achieve:

I’ve highlighted the mixer in this picture to illustrate how it’s output feeds back into the input of the delay line. With the Feedback knob turned up, this creates a much fuller flanging sound.

PHASER

A phaser is constructed in a very similar fashion to a a flanger. Instead of delaying a signal and mixing it back with the input, however, a network of allpass filters is used.

As with a flanger, an LFO is also required, but this time it modulates the corner frequencies of the allpass filter instead of the delay time (each of the allpass filters has it’s own different corner frequency, but they are all modulated by the same LFO).

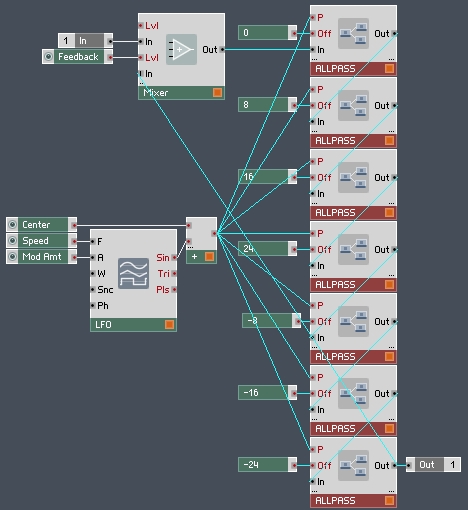
Here’s a quick phaser macro I made to illustrate the design:

I’ve highlighted the allpass network so you can see how the filters flow into each other and how the feedback goes from the last filter back into the first. The ‘ALLPASS’ macros are extremely simple, I only made them at all to save space in the main macro, and to make the structure easier to understand by looking at it.

All this is doing is changing the corner frequency of the filter by the amount specified in the offset input, named ‘Off’. This makes sure that each filter has it’s own corner frequency.

ROOM FOR IMPROVEMENT

Now, as I mentioned in the introduction, these designs can be improved upon in a number of ways: The LFO should probably have a Tempo Sync option to allow sounds that move in time with a project; the phaser can be expanded to have a variable number of allpass filters in it’s network; the ‘Off’ inputs in the ALLPASS macros can be replaced by a knob that lets the user change how much to spread the corner frequencies out; both effects could use a dry/wet knob, etc, etc etc.

Since it is not the purpose of this tutorial to build a huge, complicated flanger or phaser, but rather to give the reader a starting point from which to work, I will not be implementing these upgrades, instead I leave it up to you!

I will, however, leave you with a copy of my work for this tutorial, which you can download here.

Simply play some sound thru the ensemble to hear the effects.

Please post any questions or suggestions for future tutorials in the comments and I will do my best to help. Thanks for reading!

RELATED COURSES

Building in Reaktor for Beginners

ADSR Courses

Add to cart
SAVE 50%

Sequencer Modules in Reaktor

ADSR Courses

Add to cart
SAVE 50%

FFT (Fast Fourier Transform) with Reaktor

ADSR Courses

Add to cart
SAVE 50%

Reaktor Core Masterclass

ADSR Courses

Add to cart
Waveform Loaded
Waveform Played
×
PLAYLIST
Clear all
WISHLISTS
Create an account to use wishlists
×
SAVE TUTORIALS
Create an account to save tutorials
×
FOLLOW YOUR FAVORITES
Follow your favourite labels, formats and genre's and ADSR will show what's new in those on your next visit.
×
  • Create product wishlist
  • Save your favorite tutorials
  • Regular discounts and exclusives
  • Never miss a sound! Follow your favorite labels.
Sign up to My ADSR to ensure you're ahead of the pack. Save your favorite content and be notified of new content. You'll never miss a thing!
Create your account now!
CREATE ACCOUNT
Sign up to My ADSR to ensure you're ahead of the pack. Save your favorite content and be notified of new content. You'll never miss a thing!
  • Get days all ADSR courses free
  • Create product wishlist
  • Save your favorite tutorials
  • Regular discounts and exclusives
Create your account now!
SIGN IN
adsrsounds.com login Video streaming login
Remember me
Forgot your password?
DON'T HAVE AN ADSR ACCOUNT?
Create your account
FORGOT PASSWORD

Send info
  1. Enter your email address
  2. Click "Send info"
  3. Check your inbox for an activation link
  4. Visit activation link and enter set new password
Sign in
DON'T HAVE AN ADSR ACCOUNT?
Create your account
IMPORTANT: Is this product compatible with your system? Please check the product system requirements tab before purchasing. To proceed with this purchase you must check the box to confirm you have checked the requirements.


I have read the system requirements and agree to the return policy. I understand that refunds will not be given due to limitation of my software or operating system.

I don't agree
, you have loyalty credit available. To redeem click the button to claim !
Claim
Claim your free sounds

For every $5 you spend on ADSR receive 1 free credit for Sample Manager.

Even better, we have back-dated this so any purchases you made since 2017 have also been credited to your account!

Click the button below to claim your free credit.

Get my free credits
Loyalty credits
1Every purchase you make on ADSR* now earns you 1 loyalty credit for every $5 spent
2Once you make a purchase your credits are added to your account
3Credits can be redeemed in ADSR Sample Manager to download individual loops and samples
4To redeem simply download ADSR Sample Manager and/or log into Sample Manager with your ADSR login details
5Credits will have been automatically added to your account
6Loyalty credits expire 30 days after initial purchase
* Not including video subscriptions