FM8 Tutorials
Using theory behind FM synthesis in practice
So how to know which ratio values to use, modulation amounts and waveforms. All this is a matter of few basic principles you should be aware of when working with FM synthesis and once you’ll understand them things will not be so different from using other synths.
Subtractive Synthesis VS FM synthesis
If we look into subtractive synthesis for a moment we will see that we normally use more than one oscillator with various waveforms to generate the harmonic content for the sound. We also detune oscillators or modulate it to produce more interesting harmonic content in the sound. We are also using noise or ringmodulator to inject non-harmonic content into the waveform to produce noise or dissonant tones.
Now to vary the frequency spectrum of this mix of different waveforms we then use filter to extract and add and emphasize different frequency regions in our mix of waveforms. Then we use envelopes, LFOs and other modulation sources to vary the frequency spectrum of the sound and introduce timbre modulations over time.
Now in FM synthesis things work a bit differently. We dont need mix of more than one oscillator to produce different (in)harmonic content in the waveform. We do that with frequency modulation instead. Also we dont need filter to vary the sound spectrum. Instead we can vary the amount of modulation to produce changes in timbre over time. We can use envelopes, LFOs, key and velocity values to vary the amplitude of modulators and thus changing the modulation amount on the carrier which then results in different harmonic content in the carrier sound spectrum.
So to work with FM synthesis we don’t need filters and also we don’t need other waveforms than the sine. We can create very complex waveforms just with frequency modulation of the carrier.
To be able to succesfully work with FM synthesis you need to be aware of this few rules:
- Integer ratios of modulator and carrier produces harmonic partials in the waveform of the carrier. This is analogues to harmonic oscillators in subtractive synths which can produce various waveforms such as saw, square, triangle and sine waveforms. To produce saw wave for instance which has perfect harmonic series you would use most simple ratio values between carrier and modulator such as C:M = 1:1.
- Noninteger ratio values produces inharmonic partials in the waveform of the carrier. This is analogues to using noise and ringmodulator in subtractive synthesis to produce dissonant frequency components in the sounds.
- The frequency of this partials in the carrier is determined by frequency of both carrier and modulator frequency. This simply means that the overall frequency content of the sound depends on both carrier and modulator frequency.
- The modulation amount with which modulator modulates the carrier affect the number of these generated partials in the carrier waveform. This basically means that modulation depth controls the number of harmonics which determine the complexity of the waveform. In subtractive synthesis you would instead use filter to vary the complexity of the waveform.
Once you understand these few rules working with FM synthesis becomes very intuitive.
Sound Design Example
Let’s look into a simple example. The resulting sound will serve for a demonstration purposes so I’ve kept it simple as possible.
Imagine we want to create 8 bars long evolving sound.
At first want a low quite filtered square wave like sound (not too clear though, it should still have some body) to slowly open over a few seconds and then slowly fade away in the end.
We also want some high frequency inharmonic clang at the attack of the sound that decays fast over time.
And then we would like to have different, higher more agressive maybe slightly detuned saw like tone that sneaks in from behind and opens in the same way as we would do with a LP filter and a saw wave. This filter sweep should last right until the end of eight bars and should be loudest part of the sound right before it ends.
For the overall amplitude of the sound we want loud attack, medium sustain and a fade right before the end of 8 bars.
Now how do we think about getting this done with subtractive synthesis?
In subtractive synth you would transpose first square oscillator with LP filter to get the low part of the sound, then you would use another detuned saw oscillator in combination with another LP filter for the last part of the sound and then a noise source or more preferably ringmodulator for the inharmonic attack part of the sound.
This would result in using two oscillators with two separate filters with their own envelopes. You would also have to use additional envelope with very short settings for the noise attack part, also one additional envelope for the overall amplitude of the sound. Quite a bit of work actually.
With frequency modulation you think a bit differently. You can create all these three separate components just by modulating one carrier. So we will use one carrier and three separate modulators to create each portion of the sound in the waveform of the carrier. We could also use three separate carriers instead. But let’s keep it simple for now.
Carrier Settings
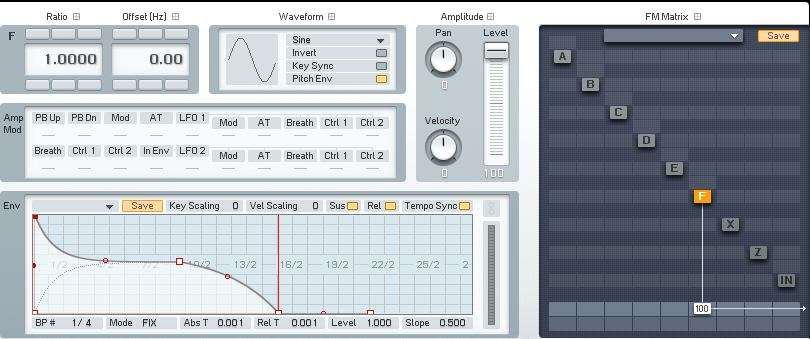
So carrier F will work as our only sound source.
Envelope of the carrier F will control the overall amplitude envelope of our sound. Set the envelope to be 8 bars long and adjust it like in the picture below.
Also operator’s F ratio is set to 1 to track the exact same pitch of the we play on the keyboard.
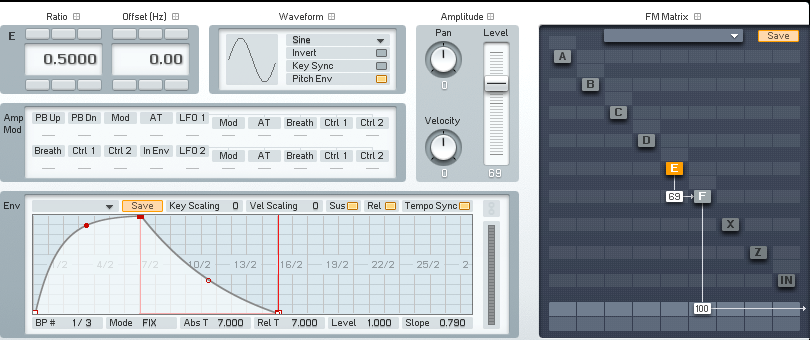
Modulator E settings
Now we want to create first the lower part of the sound. We won’t be using another waveform than sine. Instead we will introduce wanted frequencies in to the carrier waveform with FM modulation.
First let’s get the basic waveform shape we want to work with.
We want this sound to be harmonically quite rich but not to bright, something like filtered square wave.
Raise the modulation amount of operator E to the point you feel that the basis for the sound is strong enough for your taste. Unlike with regular oscillator here you can get many many flavors of different waveforms which are not really a triangle, square nor saw but can be everything in between. Try not to think about them like saw and square waves but try to evaluate the quality of the each resulting waveform while changing the modulation amount.
Ratio Settings
We wanted the sound to have some low harmonics and square “heaviness”.
We should try changing the ratio parameter of our modulator E to a lower value so it will introduce lower frequency partials or harmonics in the carrier waveform. So set the ratio value to 0.500.
This way we will introduce more complex harmonics in our signal since now the carrier and modulator have different frequency relationship (remember that the frequency of the generated partials in the carrier depends on both carrier and modulator frequency). Now carrier to modulator ratio is 0.5 : 1 (which is the same as 1 : 2) instead of a simple 1 : 1 ratio. as before.
So partials generated in the carrier waveform are now more complexly related to each other because of different frequency settings of the carrier and modulator. In fact we have produced square like waveform. I will try to explain why square and not something else in the next tutorial more in detail.
The frequency of the modulator is still in perfect integer relationship with the carrier so this still produces only equally spaced harmonic partials in the sound so everything is in perfect tune.
Envelope Settings
Now you can alter the amplitudes of this partials by changing the modulation amount with which modulator E is modulating carrier F. With this you vary the overall complexity of the waveform we have obtained with previous step.
Now we can use the envelope to create variations in the harmonic content of the sound like we would do with filter.
[audio:https://www.fm8tutorials.com/wp-content/uploads/2012/05/Square-Sample.mp3|titles=Square Sample]Modulator D settings
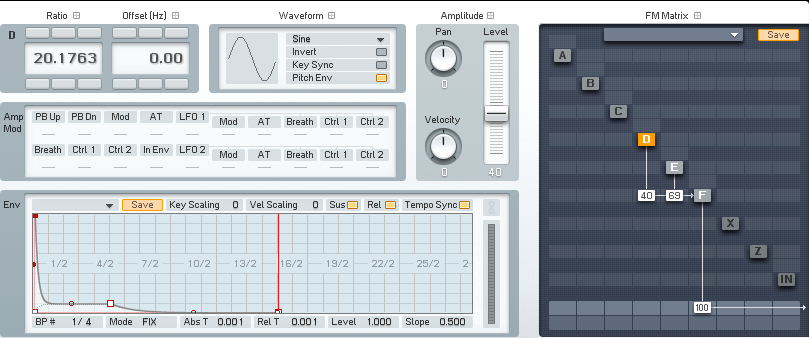
With operator D will create the second part of the sound. For this wee need to introduce some inharmonic partials in our waveform for the clang part in the beginning of the sound.
In normal subtractive synth we would do this by introducing either with a filtered noise or even better using the ringmodulator.
With frequency synthesis we can use noninteger values for the ratio of modulator. This will produce unevenly spaced partials in the sound which are not multpple integers of the carrier or modulator frequency and this will result in an enharmonic spectrum of the sound. This means the partials in our sound are so complexly related to each other (they are still not randomly spaced like in the noise frequency spectrum) that our ear cannot resolve the connection anymore so we hear this sound as non-harmonic or dissonant.
Ratio Settings
What value to choose for ratio value of the modulator D depends on how high we want the frequency content of this enharmonic component in the sound to be. You would use high ratio values if you would want to produce the basis for the cymbal and bell like sounds.
I have chosen ratio of operator D to be 20.1763. I’ve chosen this number because this clang simply sounded high enough to me at ratio setting of 20.0000. Then I’ve set it to non-integer number so enharmonic components in the sound are produced. Also I wanted this components to be as little as possible related to the fundamental pitch of the carrier.So I’ve used rather values such as 20.1763 (or maybe 20.681) instead of let’s say 20.2500 since this later ratio value would produce more harmonically related overtones than the one I’ve chosen.
Envelope Settings
We want this enharmonicaly rich component of our sound to decay quite fast so we will set the envelope of a modulator D to quite short shape. Maybe we could leave some tail in the envelope so this enharmonic partials in the sound so it doesn’t decay too fast.
[audio:https://www.fm8tutorials.com/wp-content/uploads/2012/05/Clang-Sample.mp3|titles=Clang Sample]Modulator C settings
Ok so now to the filtered saw wave part.
Saw wave in general contains both even and odd harmonics.The harmonic partials in the saw wave are spaced at equal intervals which are multiples of fundamental frequency of the sound.
To obtain this with FM synthesis we have to use simplest possible ratio value for carrier and modulator so C:M should be 1:1. This will generate partials which are only multiples of the frequency which is same for both carrier and modulator.
Self-modulation settings
The same thing happens if we modulate operator by itself. So whenever you need something like a saw wave you can use either a modulator set at the same frequency as the carrier or self-modulating operator.
In practice if you want more aggressive sounding saw wave you will use self-modulation. Be aware that at high modulation values the self-modulating oscillator begins to produce white noise like timbre because the amplitudes of each partial rise to the point where we hear them all equally instead as a harmonic series with prominent fundamental frequency. Note that this is very simplified explanation of what happens with self-modulating operator, I will explain this more in detail in the next tutorial.
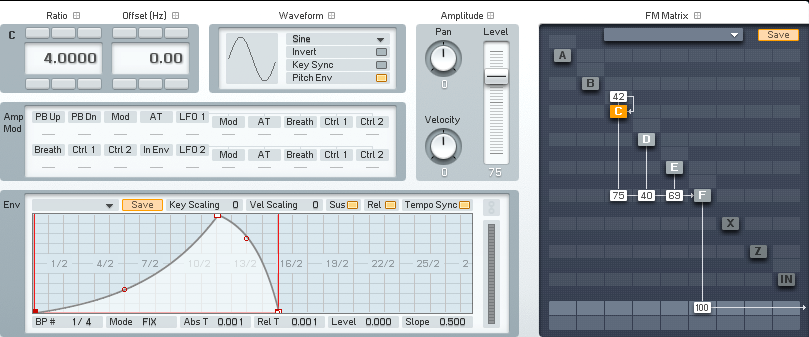
So set first self-modulation for operator C to some random but not too high value, under 50 for example. Also set modulation amount of operator C modulating operator D to some reasonable value. With combining and changing these two values determine the sound you would like to use. Again many different variations are possible.
Ratio Settings
Experiment with different integer values. First try with 1, change it then to 2, 3 and 4 to determine the wanted frequency register of the effect modulator D has on the carrier F. I have chosen ratio setting of 4. Again just because it sounded high enough but not to high.
As long as you stick with integer ratio value for operator D the effect on the carrier wave will produce only harmonic sidebands.
Envelope Settings
Now to the “filter” part. To emulate filter opening we simply have to set the envelope of operator D so it slowly introduces these partials we have just injected into carrier waveform.
[audio:https://www.fm8tutorials.com/wp-content/uploads/2012/05/Final-Sample.mp3|titles=Final Sample]Detune Settings
If we would slightly detune operator D this will create offset in the frequency position of these partials against fundamental frequency of our carrier. This will give slightly detuned feel. You can detune it even more and this will generate more complexly related sidebands we would then start to hear as dissonant like in this case:
[audio:https://www.fm8tutorials.com/wp-content/uploads/2012/05/Dissonant-Sample.mp3|titles=Dissonant Sample]If you play this sound with higher multiple notes you can more clearly hear the rich and complex sound spectrum we have created.
[audio:https://www.fm8tutorials.com/wp-content/uploads/2012/05/Final-Sample2.mp3|titles=Final Sample2]And if you just change the ratio amounts and modulation values of modulators you get all sorts of very different variations. Here I play few short notes over the sustained one.
[audio:https://www.fm8tutorials.com/wp-content/uploads/2012/05/Final-Sample-variation.mp3|titles=Final Sample variation]Conclusion
In this tutorial we have created very rich time varying sound spectrum with a use of a single carrier and three modulators. This type of sounds would be quite hard to get with an usual subtractive synth.
The possibilities are endless since we can use various operator configurations with two or more carriers and modulators. This various configurations of operators are referred as algorithms.
Now with multiple numbers of carriers and modulators the spectral changes in the sound become so complex that we cannot predict exactly what will happen to the sound spectrum. But as you have seen we don’t need to think about it in this way to make sounds with FM.
Once you know these few basic principles behind FM synthesis you can now effectively control the timbre of the sound. And this all it takes to create some very interesting sounds with it.
Hope this tutorial was helpful. If you already knew all this I will do another one with a bit more in-depth explanation of theory behind FM synthesis.
Till then!


 YOUTUBE