FM8 Tutorials
Tips for Working With Dynamically Layered FM8 Synths
One of the best ways to gain a deeper understanding of how FM synthesis works is to create different types of layered synths, the more dynamic the better. This quick tutorial shares some ideas to help you make better layered FM8 synths!
When first starting out with frequency modulation synthesis, especially if you learned initially with subtractive synthesis, it can be a bit difficult to wrap your mind around the idea of carriers and modulators. I find that when teaching people are are totally new to FM synthesis it is usually best to begin with a few basic steps and then quickly move into layered sounds. This is because it helps to reinforce how an operator can be used as BOTH a carrier and/or a modulator, even in the same patch. So for this lesson I’m going to make a very simple bass synth that is layered in such a way that you can hear each distinct element playing its part to create a sound much bigger than the original pieces. This should help many of you grasp how to design better FM8 synths in general simply by having a better understanding of how it all works.
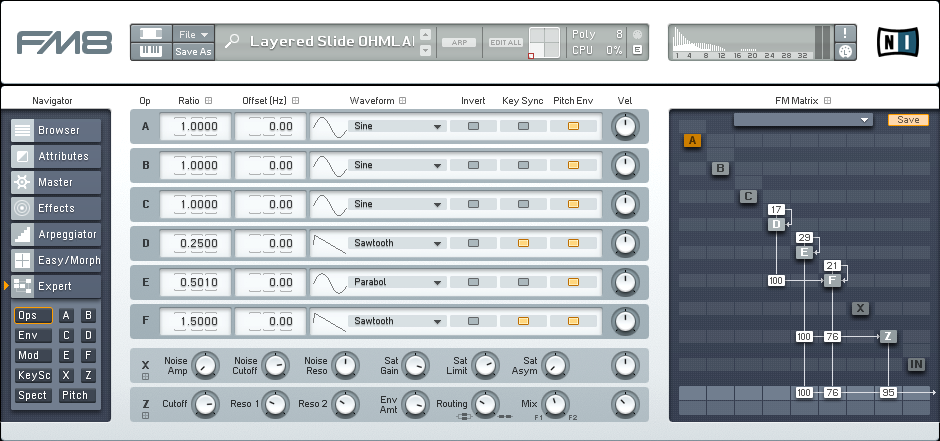
Most FM8 synths start out in the FM Matrix, where the routing is set up. In this example there are two main carriers (Operators E and F) and one main Modulator (Operator D). The filter (Operator Z) is also providing some support as well as extra movement. We’ll get to that in a bit. Since Operator D, or Modulator, is not routed to the output it is only playing one role in this patch. Also notice that Operator E is not Key Synced, while the other Operators are. It’s pitch is also offset a bit to create more movement. These two things combined add an element of random that the human ear tends to enjoy.
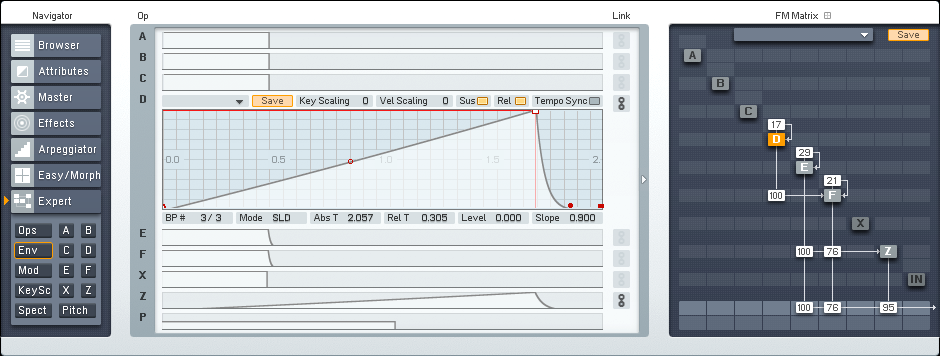
To make Operator D and the effect it has on Operator F stand out, we can simply create an envelope curve that will make the changes that occur more noticeable. If we make the envelope curve long enough, we can expose more textures and character that wouldn’t be noticeable at all if the curve was shorter. It is small things like this that make designing FM8 synths such a fantastic and enjoyable process.
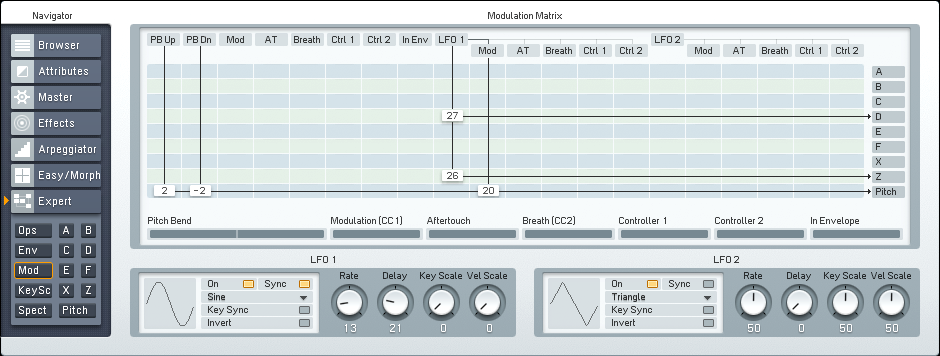
Here on the Mod window you can assign an LFO to control your operators and pitch. Adding just a touch of movement, delayed slightly to make room for the modulation layer to finish, through LFO1 to both Operators D and Z makes the sound more interesting. This little trick can be used in all sorts of FM8 synths.
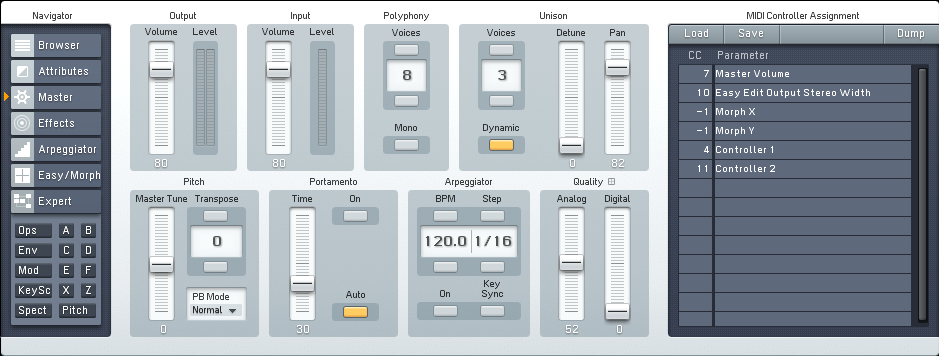
Not all FM8 synths need to be detuned via the Master window. This is something that I see a lot of people doing, but they don’t really know why they do it! Here the total number of voices has been increased to three. Not to make it louder or to make detuning possible, but to spread those voices out through the Pan and Analog Quality tools. Panning adds width (and perceived depth), while the Analog Quality imparts a touch of movement (and perceived randomness).
Below is a small audio sample of this synth in action. No processing of any kind has been applied outside of FM8.
[audio:https://www.fm8tutorials.com/wp-content/uploads/2013/09/FM8-Layered-Synth.mp3|titles=FM8 Layered Synth]Cheers,
OhmLab
Have A Question Or Comment About This Tutorial?
Want to ask a question about this tutorial or perhaps you have something to add ?
Click through to our forum post about this tutorial and join the conversation!


 YOUTUBE