
Drums, FM8 Tutorials
Drum Synthesis with FM8: Creating a hi-hat sound
This is a first part of a drum synthesis tutorial series which I will be making in next couple of weeks.
Today we will be making simple hi-hat sound, which is quite straightforward on itself but we will also look into how to create more realistic hi-hat dynamics and articulations.
Creating the noise part of the hi-hat sound
First, activate the noise X module which will act as a basis of our sound.
We have to mimic the most notable part of the hi-hat sound which are the series of enharmonic partials we hear when we hit the real hi-hat.
We normally use noise generators in order to synthesize this component of the hi-hat sound.
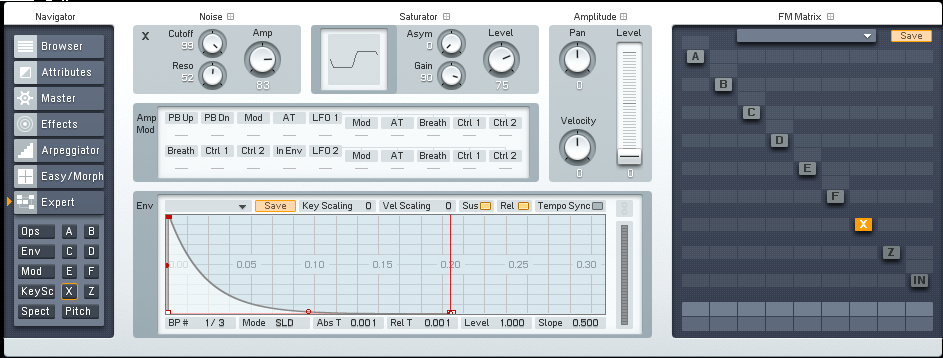
For now we want to use the highest possible frequencies so be sure to set the X noise module cutoff to a value of 100. Later on you can adjust the noise cutoff parameter to get different variations in hi-hat sound.
Also resonance parameter of noise module X is very important. It defines the sharpness of the hihat sound by emphasising the frequency region around the cutoff frequency. Set it to just above 50 for now.
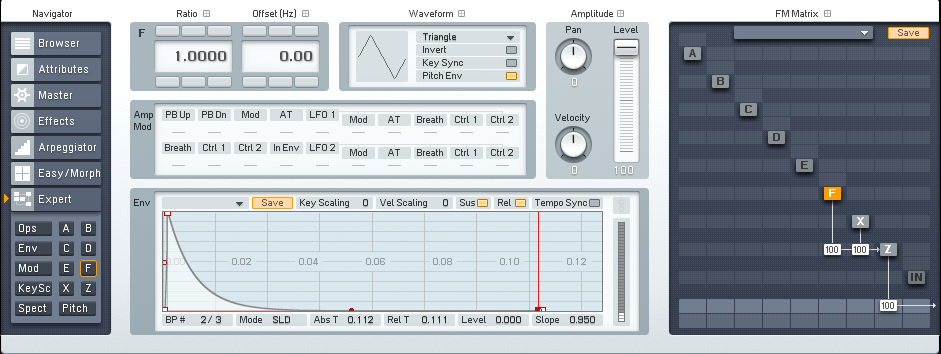
We will control the amplitude of the noise by a very sharp envelope with no sustain and short decay.
Set it to something like this:
We will also have to use Z module to filter out the low frequency component of the noise signal and to further shape our sound.
Activate filter Z module and route it to audio output.
Feed the audio output of the X module to Z module.
First we should get rid of a filter module Z default key scaling in the KeySc page of FM8 so our filter cutoff frequency won’t be affected by note pitch values.
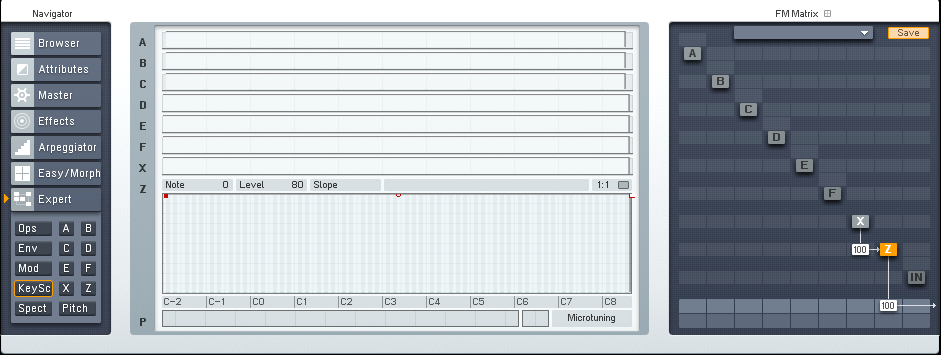
Also be sure to set both Mode parameters of the filters to something half way between hipass and bandpass filter like in the picture below.
With resonance parameter you can control the sharpness of the sound with cutoff its brightness and with routing of the filters and filter output mix parameters you can further adjust the sound with a great variety of nuances.
Here are the settings I have used:
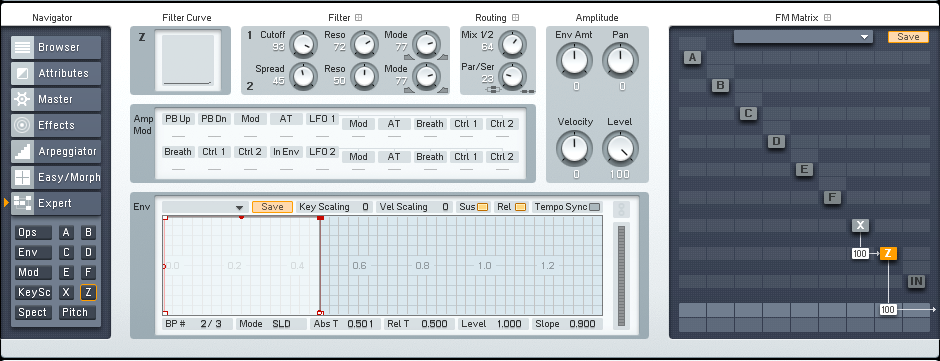
I recommend you experiment a bit with these parameters and also the X noise module cutoff and resonance parameters to get different timbres.
Creating the initial part of the hi-hat sound
To create a bit more realistic hi-hat sound we should also add another sound which will mimmic the wooden drum stick hitting the circular metal plate of the cymbal.
This initial stage of the sound should still have some sense of the pitch and it should be lower in frequency and its amplitude envelope should be shorter than the noise portion of the hi-hat sound we have already created.
We will use operators for creating this noisy ping sound.
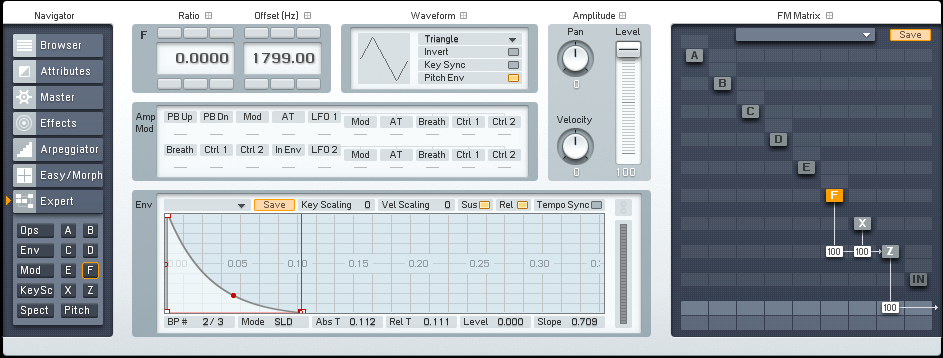
Acitvate F operator and choose triangle waveform.
Set operator F amplitude envelope to be approximately half shorter than the envelope of the X noise module.
Again very sharp attack, no sustain and short decay.
The other very important thing is we don’t want our operators frequency to be affected by the pitch of the midi note we play. We want it to be static in pitch.
To do that in FM8 you should set the ratio of operator to zero.
As we know in FM synthesis ratio determines the frequency relation between operators. Any operator with ratio set to 1 will follow the exact frequency of the played note.
If we set ratio of a certain operator to 0 this also means there will be no frequency relation of that operator to the frequency of the midi note played and it will operate at lowest possible frequency which we cant even hear.
We can now set the desired frequency of the operator solely by its offset value.
This will simply add frequency value in hertz to our current set operator ratio which we have set to zero and because of that the offset parameter value now fully determines the frequency of the sound.
Set it to 1800 Hz for now and also route audio output of F operator to Z filter module.
This also means you can now tune your hi-hats to the desired note simply by typing in the frequency value in hertz of a wanted note in as an offset value in any operator (with ratio set at zero).
Now we have high frequency click but we also want very high almost noise like frequencies to be present in the signal. To do that, we will use another modulator to modulate operator F.
Set operator E to something like this in the picture below and modulate operator F with very high amount:
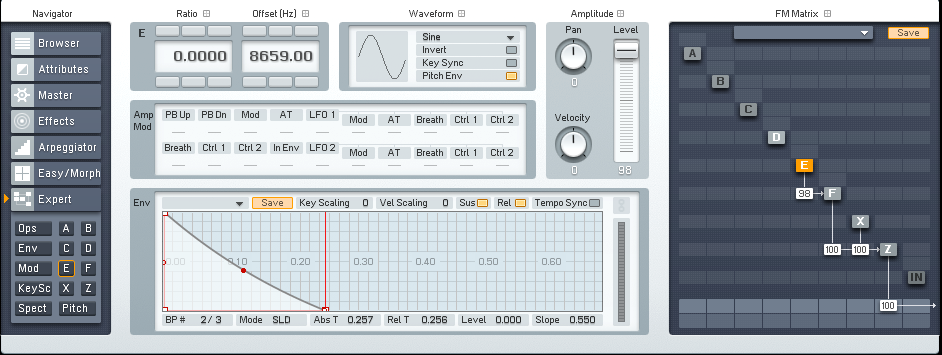
We still hear the tone of the click way too clearly so we should use another modulator to modulate operator E to get more sidebands produced around fundamental frequencies of operators E and F but we still need them to retain very slight sense of pitch.
Activate operator D and set it like in the picture below.
I have also set operator F to modulate operator D with very high amount so we get almost noise like frequencies.
And I have also adjusted the operator F and X audio outputs to further balance the click and noise part of our hi-hat sound.
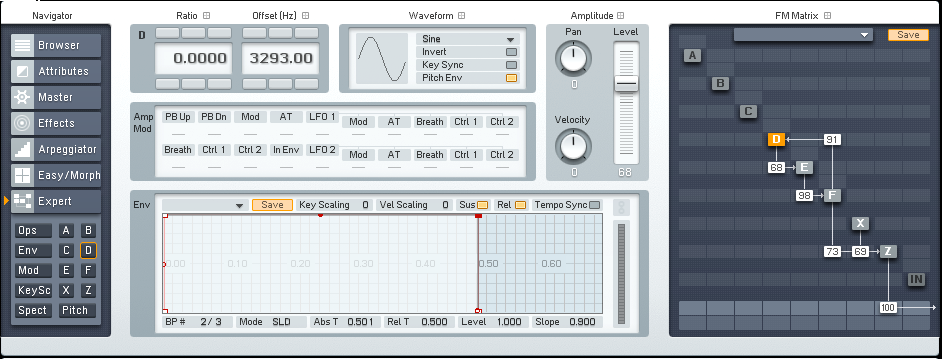
Experiment with different modulation values and mix settings to get the desired sound.
[audio:https://www.fm8tutorials.com/wp-content/uploads/2012/03/Sample1.mp3|titles=Sample1]Controlling the dynamics and articulations
We also want to have more dynamics in the hi-hat sound.
In the most simple case just adjust the amplitude sensitivity to velocity of the F operator and X module to get basic volume control over the hi-hat sound.
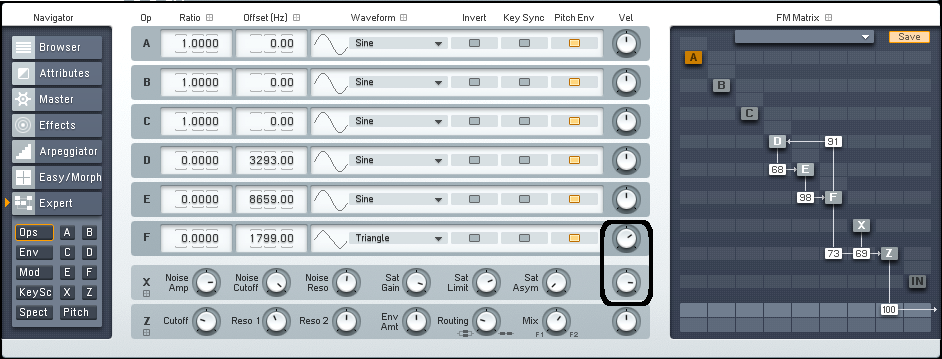
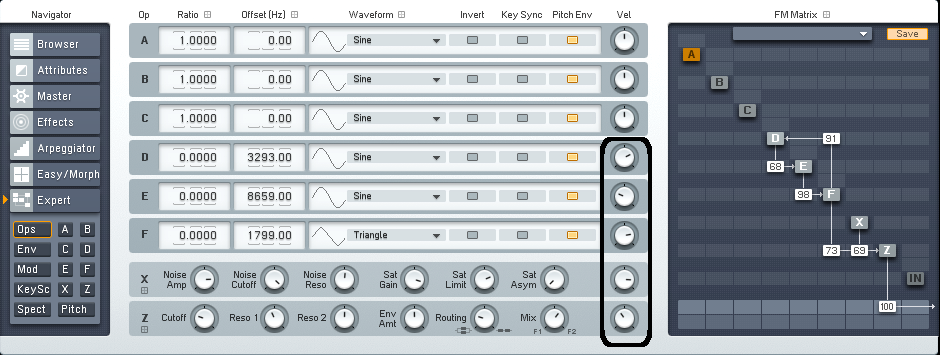
We also want to have variations in a timbre and not only in volume. And here things get a bit more interesting.
Adjust the velocity sensitivity for all the operators and modules we have used. Also use negative velocity sensitivity amount and to get more realistic variations in sound.
Using velocity and key scaling on envelopes
Also another very cool thing to do is to set different velocity and key scaling settings for the various envelopes we have used.
This way you can change the length of each envelope with velocity and note pitch values.
And since the note pitch value doesn’t affect our sound in any other way you can use note pitch values just for envelope key scaling to control the dynamics of the hi-hat sound.
This way you can get some very cool 2 dimensional articulations just with changing the velocity and note pitch values.

Hope you enjoyed this tutorial. I’ll be back with another tutorial on drum synthesis in FM8 soon until then you can check my kick drum tutorial I’ve made here.
If you have any question or comments please leave it below.
Have fun!
 YOUTUBE