FM8 Tutorials
Designing a More Dynamic and Crunchy Bass Synth with FM Synthesis
This tutorial walks through the steps of how to make a more thick, crunchy and interesting bass synth with FM synthesis.
There are countless ways to design killer bass synths, and this tutorial doesn’t claim to be the best. But it does share a few tips that you can use on your own sounds to help add more texture, depth, impact and interest in just a matter of seconds. The key is to not overdo it with any of the operators in play and to be very precise with the routing parameters you set up in the FM Matrix. Making a bass synth with FM synthesis is easy. Making a great one (intentionally) is something that gets easier with time and experience. Let’s jump right into this one and see what makes it different!
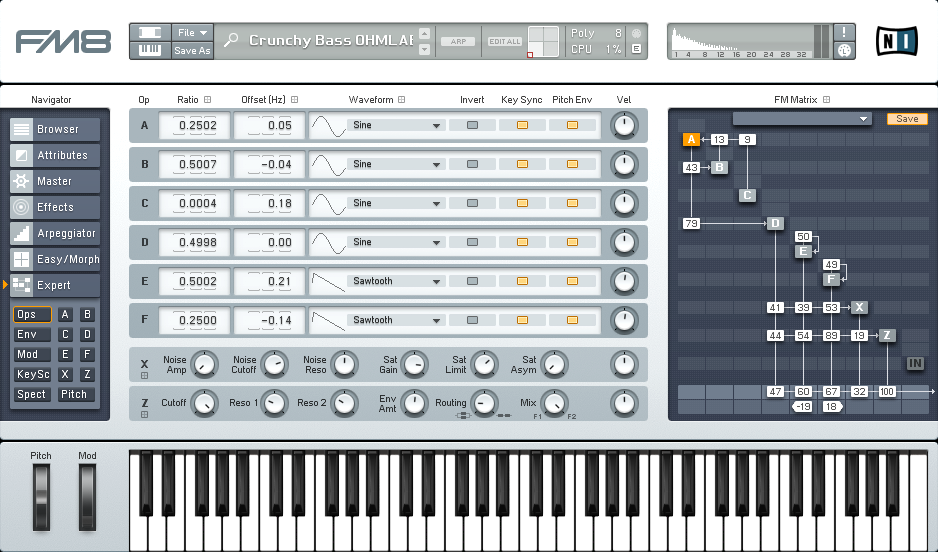
As you can see in the image below, this is an interesting set up for this type of sound. Operators A, B and C are basically being used to introduce additional character through harmonics. Operators E and F are the main driving forces behind our sound, with Operator D offering up some traditional sub bass support. Since the Modulators (Operators A-C) are only affecting Operator D directly, you can easily toggle on and off the effect they provide by either turning off Operator A or D to quickly compare any adjustments you may make. When designing a bass synth with FM synthesis like this it is nice to have a quick audition mechanism built-in. Notice that these modulators are all running at a very low rate, which imparts more texture and character without affecting the overall tonality, similar to using an LFO in a sense.
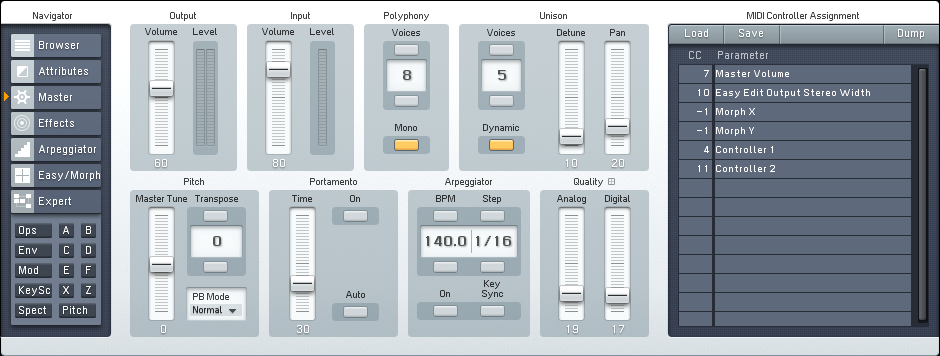
Here on the Master window, the total number of Unison Voices has been increased to five. This is not a hard and fast rule, but often times when working with this kind of sound you can help your synth cut through the mix better using an odd number of voices, rather than an even number. It has to do with how the voices are spread out via the Detune, Pan, Analog Quality and Digital Quality features. It leaves one of the voices in the middle of the spread, providing you with a handy focal point. Just one more trick to remember when you want to create a sharp bass synth with FM synthesis.
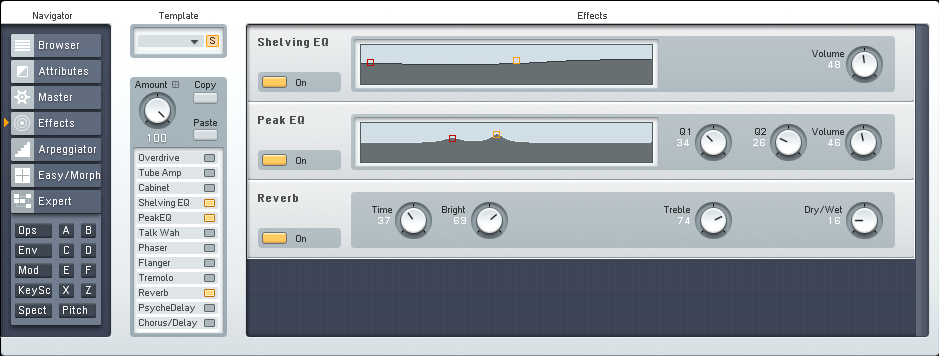
The last step in the process is a quick on. Just a little EQ to finish shaping the sound and a subtle touch of Reverb to add a little thickness. It is important to have some emphasis on the mids and highs in a sound like this one, so things don’t get too muddy or washed out. The more clarity you can get in it, the better.
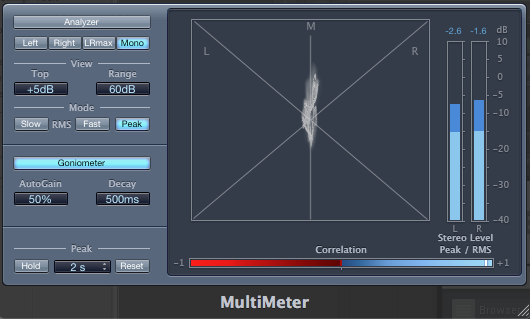
As you can see in the image below, when this synth is in action is is incredibly focused right down the middle. This means it will be easy to keep it centered and clear in the mix, prefect for modern mixing and mastering techniques–like mid/side processing. It also means that it will do a little better with additional effects. The width and depth come from a combination of modulation, detuning and voicing spread. Each has been kept fairly minimal, making this a much more dynamic and stable synth when compared to something similar that relies more heavily upon any one technique.
Below is a short sample of this synth in action. No processing of any kind has been applied.
[audio:https://www.fm8tutorials.com/wp-content/uploads/2013/06/Crunchy-Bass-OHMLAB.mp3|titles=Crunchy Bass OHMLAB]


 YOUTUBE