
Absynth Tutorials
Creating Dubstep Wobble Bass With NI Absynth (NI Absynth Sound Design Tutorial Series)
Here are few variations of the patch we will be making. Note that some of them are quite extreme just to show you some of the Absynth nasty potential.
[audio:https://www.absynthtutorials.com/wp-content/uploads/2012/06/Sample-Patch-Variations.mp3|titles=Sample Patch Variations]This is raw sound from Absynth, no external effects, distortion or resampling are used (except some sidechaining to the kick). Only drum loop and one instance of Absynth. Each 8 bars represent one variation of the patch.
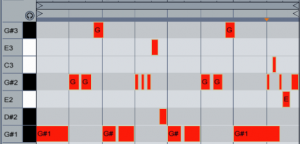
Here is the midi sequence used for this tutorial:
Oscillator C settings
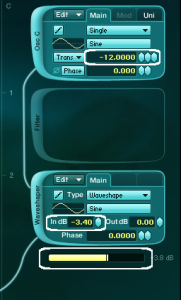
First let’s create the lowest part of the sound. We will simply use sine wave oscillator in combination with waveshaper to give our sine waveform some overtones so it won’t sound so plain.
Enable oscillator C. Set it’s transpose to -12.
Enable also waveshaper and set the In parameter to -3.40.
Set the Channel C output mixer to -3.8 dB.
We need this sound to be playing in mono, so go to the Perform section of Absynth and set Poly to 1.
Also set dB amount to -9. I’ve ended with this number after I have finished this patch. I have changed this number several times during the patching to adjust the overall volume of the synth so it doesn’t clip in the output meter of Absynth.
[audio:https://www.absynthtutorials.com/wp-content/uploads/2012/06/1-Sample-Osc-C.mp3|titles=1 Sample Osc C]Oscillator B settings
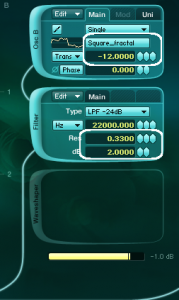
Enable Osc B. For the waveform choose Square_fractal. This is a great waveform for making nasty lead sounds.
Transpose the pitch for -12 semitones.
We will also use LPF -24 dB. I’ve chosen this LP filter because it has steepest slope and is more aggressive sounding than the LPF 8 Pole (the Pole one with the same -24dB slope).
Set the filter cutoff to fullest amount and resonance to 0.3300.
Set filter output parameter to 2dB.
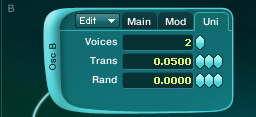
Also set Unison voices to 2 to add a bit of detuning.
[audio:https://www.absynthtutorials.com/wp-content/uploads/2012/06/2-Sample-Osc-B.mp3|titles=2 Sample Osc B]LFO1 settings
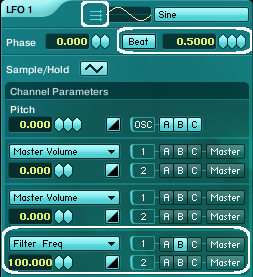
Now let’s set the LFO to modulate filter cutoff of the filter B1.
Enable LFO 1.
Set it to Beat mode so it will be synchronized with the clock of your host and set the beat parameter to 0.500 (1/8 of a bar).
Also we want LFO to be reset with every new note so set it to poly mode. Since we use only one voice for our whole patch the LFO will be actually in mono but it will still get reset with every new note played. You can learn more about this in LFO
Set Filter modulation amount to 100 and enable B knob in the first row.
Also we could modulate our sine oscillator C volume just a bit to create some dynamics in the lowest part of the sound since sine wave isn’t affected by the LP filter.
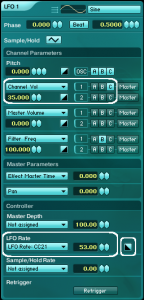
Set the modulation amount for oscillator C volume to 35.00
Now assign LFO rate to macro knob 1 with the amount of 53.
I have also inverted the modulation so the higher the macro 1 value is the lower LFO rate gets (If find it easier to control the wobble effect this way).
Here we go, we have a basic wobble effect.
[audio:https://www.absynthtutorials.com/wp-content/uploads/2012/06/3-Sample-LFO.mp3|titles=3 Sample LFO]Waveform editing
Another cool thing in Absynth is you can create your own LFO waveforms. You can get many different wobble effects trough this technique.
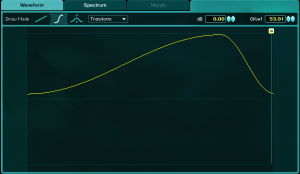
Let’s create only positive sine wave for the LFO waveform. This only positive waveform works maybe a bit better at higher LFO rates, since the modulation doesn’t choke the sound because of the negative values of the LFO waveform affecting the filter.
Click on the waveform selector of the LFO. Click on the New button and edit the waveform to something like this.
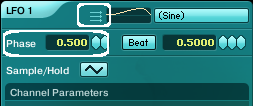
Also set the phase of the LFO to 0.500, so it will start right before the highest peak of the LFO waveform when the new note is triggered (be sure LFO1 is set to poly mode).
[audio:https://www.absynthtutorials.com/wp-content/uploads/2012/06/4-Sample-LFO-Uni-polar.mp3|titles=4 Sample LFO Uni polar]Ring-modulation
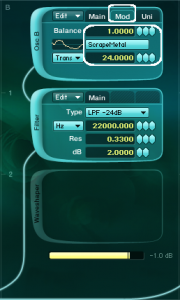
We also need to make our sound a bit more interesting. Go back to the Osc B and set it to ringmod mode.
We could ring modulate our Main oscillator with another oscillator with morphable waveform. This will introduce all kinds of weird frequency changes and sidebands to our waveform of the Main oscillator.
Set waveform of the Mod oscillator to Scrape Metal (found under the Morph Waveforms), Trans to 24 and set the balance parameter to 1.
Now we will modulate the Wave Morph of the Mod oscillator B with LFO2. Also, the LFO2 rate will be modulated by LFO1.
LFO2 settings
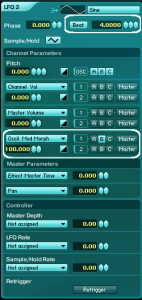
Set the LFO2 to beat mode and it’s rate to 4.000.
Set the modulation target of the LFO2 to Oscil Mod Morph and choose destination just for channel B in the first row. So now we are modulating the wavemorph parameter of the Mod oscillator in channel B.
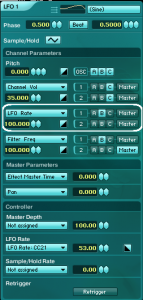
We need to set LFO1 to modulate LFO2 rate. Set modulation target of LFO1 to LFO rate. Choose only LFO2 to be modulated by choosing only B button in the first row (B in this case means only LFO2 rate will be modulated).
[audio:https://www.absynthtutorials.com/wp-content/uploads/2012/06/5-Sample-RingMod.mp3|titles=5 Sample RingMod]Control Driven Envelopes
We should also automate the amount of the ring modulation of our morphing oscil B Mod.
We will do that with control driven envelopes.
Right click the balance parameter of the Mod Oscil B and choose create new envelope.
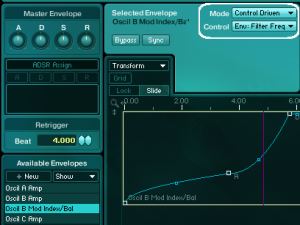
Now set this envelope to Control Driven Mode. Set the source to macro control 2. Now with moving macro 2 we are scanning trough the envelope which represents the balance amount of Mod Oscil B.
Set envelope to something like this. The important thing is to set the envelope to non-linear shape, but you can also create more complex shapes which will more drastically alter the sound.
Automate the macro 2 slider. Automation in steps can cause some clicks and pops with control driven envelopes so you should do it in a continuous line rather than steps.
We should also assign other control envelopes which would be controlled by the same macro 2 automation.
Control driven envelopes are really great since you can use just one automation line in you DAW and then link several different control driven envelopes with different shapes for different parameters and thus creating complex variations in the sound just with one line of automation.
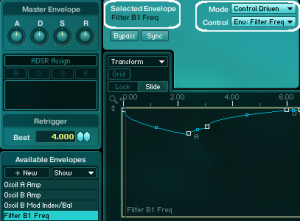
Let’s do this for filter envelope so we will get slight variations in filter B cutoff frequency. This will also influence the overall wobble effect.
Assign new envelope to filter B frequency and set it to Control Driven mode controlled by the macro 2.
The envelope shape shouldn’t go too low or else it will choke the sound too much.
[audio:https://www.absynthtutorials.com/wp-content/uploads/2012/06/6-Sample-Control-Driven-Envelopes.mp3|titles=6 Sample Control Driven Envelopes]Oscillator A settings
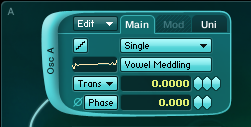
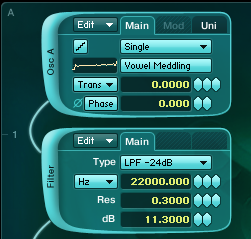
Ok, now let’s add another oscillator. We will use it in single mode.
Choose Vowel Meddling waveform from the Morph Wave menu.
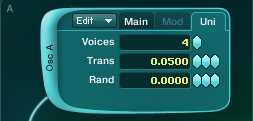
Set Unison voices to 4. This will push the sound of Osc A in the back so the high frequency content won’t sound so dominating.
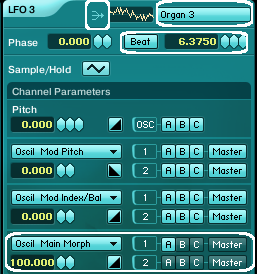
Let’s set LFO3 to modulate wavemorph of Oscillator A.
I’ve set LFO3 to Beat mode, rate to 6.3750. I’ve chosen such uneven number to get some more random modulation since this LFO is in mono mode and it wont be retriggered by every new note played.
To add even more randomization to the wavemorph of the oscillator A choose some complex waveform for the LFO3. I’ve chosen Organ 3 waveform. This a great way to obtain semi random modulations in Absynth.
Enable filter A, choose LP-24dB and set frequency to fullest amount and resonance to 0.300, output to 11.300 dB.
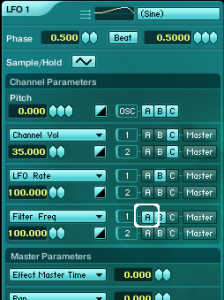
Now we have to assign LFO1 to also modulate the filter A frequency. So enable filter modulation target also for channel A in the LFO1 control panel.
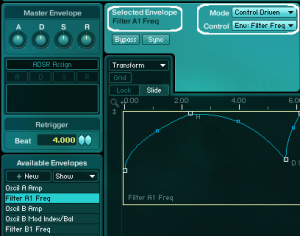
Also assign another Control Driven envelope controlled again by the macro 2 to modulate filter A frequency.
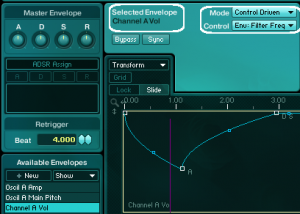
One last thing to do is to create also control driven envelope for the Channel A Volume parameter, so this high frequency content of our sound will vary in the loudness creating sense of movement in the sound. Also lower the channel a mixer to -6dB.
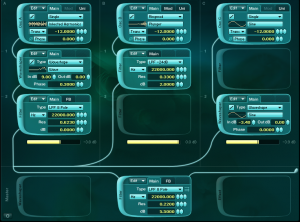
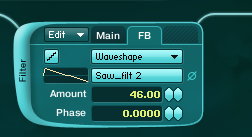
[audio:https://www.absynthtutorials.com/wp-content/uploads/2012/06/Sample-Final.mp3|titles=Sample Final]Now the real fun begins. Simply change the waveforms in oscillators, channel mixer settings and also the shapes of control driven envelopes. To get more extreme variations use waveshaper module with morphable waveforms like in the picture below.
Here I have change the waveform for Osc B to morphable one, I’m also using the morph on the waveshaper’s waveform (both modulated with LFO2) and I’ve used master filter (not modulated) with these Feedback settings. This works as a additional distortion module rather than classic LP filter.
As you can hear some very extreme effects can be obtained this way:
[audio:https://www.absynthtutorials.com/wp-content/uploads/2012/06/Sample-Extreme-Variations.mp3|titles=Sample Extreme Variations]There is also another very interesting way to make wobble sound in Absynth with morphing envelopes. We will save this for some future tutorial but here is how that sounds (I still have to work a bit on this technique though)
[audio:https://www.absynthtutorials.com/wp-content/uploads/2012/06/Sample-Envelope-Morph.mp3|titles=Sample Envelope Morph]I hope you have enjoyed this tutorial and learned something new. I’m not good at producing dubstep really so I’m sure you will be able to take this to another level and if you do so please share the results with us.
If you have any questions or comments feel free to post it below.
Till next time!

 YOUTUBE