
Absynth Tutorials
Beginners Tutorial Series: Envelopes In NI Absynth
Envelopes in Absynth are a bit different from those found in most synthesizers which is one of the main reasons why Absynth is such a great synthesizer.
We will look into some quite advanced features but be aware that these are only like additional possibilities and it’s possible to use Absynth envelopes in a very straightforward way. This tutorial will teach you how to do that and much more.
The most important thing to remember in Absynth is when an envelope modulates a parameter, the value set in the Patch Window represents the maximal value of the envelope.
The envelope can reduce this value but cannot increase it.
For example: If a filter with a frequency of 5000 Hz is modulated by the envelope, then the envelope works only between the range of 5 Hz to 5000 Hz.
This is a source of great confusion when first using Absynth. So the modulation amount of any envelope is set with the parameter value. This is not a limitation really but it simply works great with Absynth architecture.
Envelope List
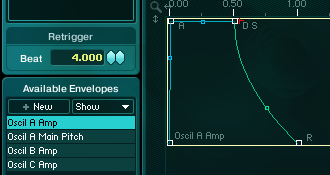
The envelope list contains list of all of the active envelopes.You can select an envelope for editing by clicking the envelope name and it will appear in the Envelope Display.
You can select several envelopes to be displayed in an envelope display from the list by holding down the Shift key and clicking on the highest envelope followed by the lowest. To select several non-consecutive entries from the list, hold down the option-key (Mac OS) or Ctrl-key (Windows).
Adding new envelope
You can assign a new envelope to parameter in two different ways.
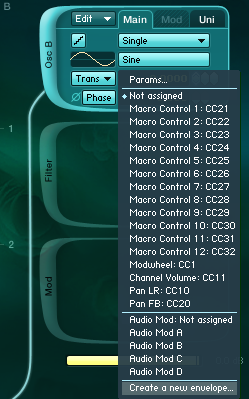
First is to right click on desired parameter you wish to modulate in the patch window. A drop down menu will open and then choose Create the new envelope text.
The second way to assign envelopes is in envelope control window.
Lets create a new envelope which controls the pitch of the oscillator.
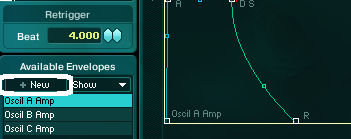
In the envelope window click on the New button.
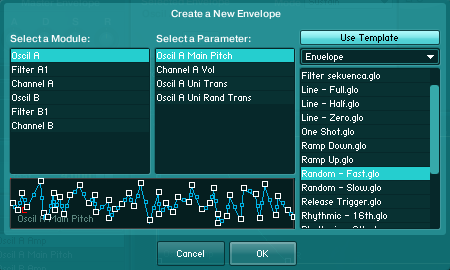
This will open a new window, where you can choose the parameter you want this new envelope assigned to.
Also you can from various templates of pre-programmed envelopes to save you the time.
This will create the envelope in the Envelope window of the Absynth and will automatically open it with envelope prepared for editing.
Editing Envelopes
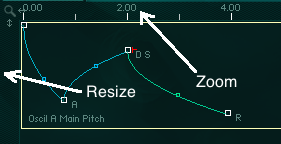
You can edit the envelope by moving it’s breakpoints. You can zoom in and out by placing your cursor on envelope’s timeline, click and drag up or down.
You can resize the envelope window by clicking and holding on the empty space on the left of the envelope and drag up or down to resize the whole envelope.
Breakpoints
To create a new Breakpoint simply hit a command-click (Mac) or a right-click (Windows). To delete a Breakpoint, perform a Ctrl-click (Mac) or respectively repeat the right-click (Windows).
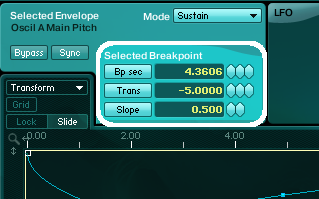
Click on the desired Breakpoint to select it for editing, and you can then adjust the following controls in the Selected Breakpoint area:
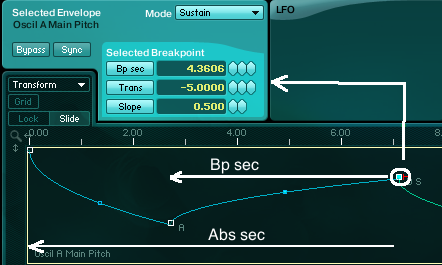
1. BP seconds tells you position of a edited breakpoint on the x axis in seconds relative to the previous breakpoint.
If you click on a toggle button Bp sec it will turn Abs sec and this tell you the position of edited breakpoint from the very beginning of the envelope.
2. The second parameter of the edited break-point is the value of parameter you are controlling with the envelope.
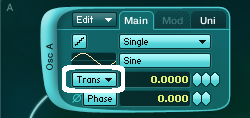
In this case we are controlling the pitch of the oscillator so the value is shown in Trans units.
And why not in Hertz? Because in the patch window the oscillator A is set to display it’s frequency in Trans units.
You can click on the Trans button and change to Hertz or ratio value and the break-point value will now be displayed as chosen with the parameter the envelope is controlling.
3. The third parameter is slope. You can adjust it by dragging a small rectangle between two breakpoints.
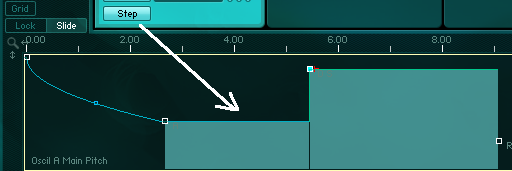
Also you can change the slope into step by clicking on the Step toggle button. As you can see in the picture I’ve done this to the second and third break-point of the envelope.
So you can use steps and slopes at the same time. Useful for things like controlling the oscillator’s pitch with steps values and then throwing in occasional pitch slide.
Envelope Sync and Grid functions
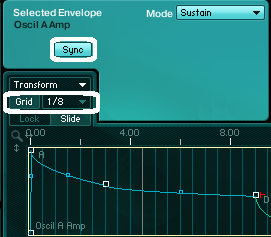
By clicking on grid button you enable the grid which resolution is set right next to it.
If Sync button above is enabled, the grid resolution is tied to your host tempo. If Sync button is disabled, the grid is tied to tempo set in Absynth.
With slide you can determine how the Breakpoints react to movement with the mouse: If Lock is enabled you can only move break-point between left and right break-point but if Slide is selected, all of the following Breakpoints move together with the break-point that is currently edited.
Envelope Modes
As you may have notice Absynth envelope is consisted of two colors.
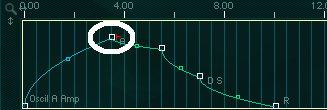
The blue one and the green tail. The green part of the envelope is the release part of the envelope.
Between the blue and green part of the envelope there is red marker which you can drag and drop to any other break-point (apart from first one) to change where you want your release part of the envelope to start.
This is very useful if you want for instance modulations to start only after you have released the note played.
So you can create very long sounds which evolve even after you have released all of the notes on your keyboard.
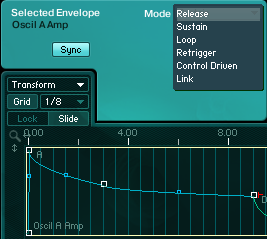
You can specify this behavior of the envelope with different envelope modes:
Release Mode
In this mode the envelope will simply proceed from beginning to an end as long as the key is being held. When it reaches the end it will stop.
But if you release the key before it reaches the release part (the green part of the envelope) the envelope will jump to the red marker (the beginning of the release point of the envelope) and proceed trough the green part of the envelope to the end.
Sustain Mode
This mode behaves like the standard ADSR envelopes in most synthesizers.
By holding the key envelopes proceeds trough the blue part of the envelope, when it reaches the red marker it simply waits there as long as the key is being held (sustain). When the key is released it simply proceed trough the green part of the envelope to the end.
As with above mode if the key is released before it reaches the red marker it immediately jumps to the release part of the envelope and goes from there to the end.
Looping Mode
This is very important mode in Absynth. It allows you to loop the envelope.
It will loop only the blue part of the envelope as long as the key is being held.
When the key is released it jumps to the red marker and proceed from it till the end of the envelope.
Control Mode
In this mode you can assign the envelope to the velocity or macro controller slider in Absynth (which can be controlled via midi).
Envelope in this mode is not being triggered anymore but instead you can now scan trough the envelope with a turn of a knob.
Knob at the min position represents the beginning of the envelope and at the max position it represents envelope’s end.
Imagine complex envelope shapes you are scanning trough with your midi controller or complex velocity response shapes for any parameter in Absynth. It’s even more fun than it sounds.
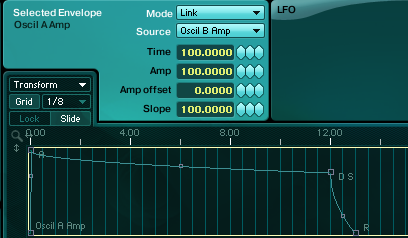
Link Mode
If you want two envelopes to share the same shape (you need two different filters with the same envelope) you can use link mode.
Choose the source envelope you want your envelope to link to.
Now you can directly edit only the master envelope and not the linked one anymore (which has turned grey). But you can still do time and amplitude scaling, amplitude offset and slope adjusting on the linked envelope.
Controlling the envelope
You can also control the envelope in real time.
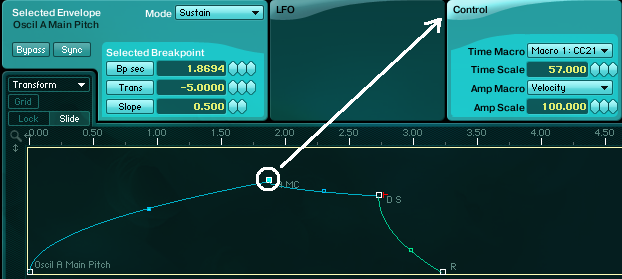
The most basic example would be controlling any break-point in the envelope with velocity parameter or Macro control slider.
To do this, just click on the break-point and click on the control tab.
You you can control break-point’s time (position x on the envelope axis) and amplitude (position y on the envelope axis) by either Macro control (which can be assigned to midi) or velocity note values.
Here you can see we are controlling the envelope’s break-point Time scaling with Macro 1 and it’s amplitude with velocity. This is a great way to add dynamics to your sounds.
LFO
Also you can add complex LFO shapes to the envelope, again for any of the breakpoints (except the very first one).
This turn envelope into complex but very easily editable LFO.
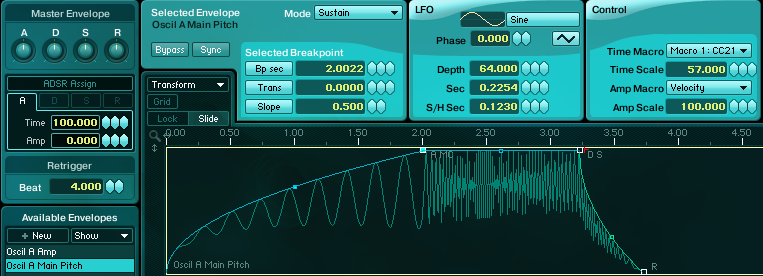
Select a breakpoint and turn on the LFO by clicking on the LFO tab.
LFO waveform shape is global for the whole envelope.
With Phase parameter you can adjust the start position of the LFO waveform and it is also global for the whole envelope.
You have these parameters available to edit for each break-point:
Depth controls the intensity or modulation depth of the LFO for each break-point.
Sec parameter controls the rate of LFO for each break-point.
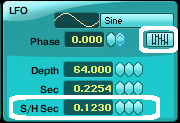
Also you can use envelope LFO in Sample and Hold mode.
To enable this mode click on the LFO mode button like in the picture below.
This means that new value from the LFO waveform will be sampled at constant time interval which is set with S/H Sec parameter in seconds. This is a great way to produce step like modulations and semi-random patterns.
Master Envelope
But you wanted to morph the envelope with your MIDI controller in real time?
No problem. Absynth has also Master Envelope.
You can control Amplitude and Time scaling of the envelope with four MIDI assignable Master Envelope knobs.
You can control several breakpoints with one knob but also you can control one break-point with several knobs.
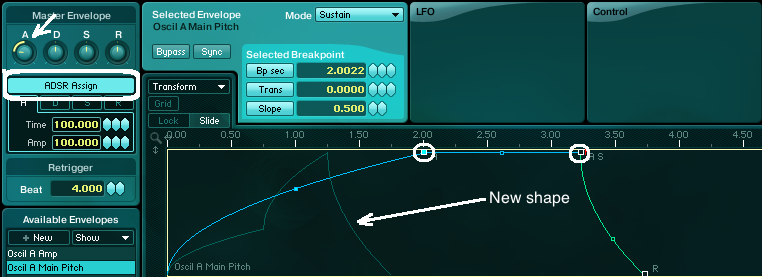
To assign the break-point to Master Envelope control click on the ADSR Assign button and the choose one or more breakpoints to be linked to the knob (choose to which one of the four knobs -A, D, S or R). Also you can assign the breakpoints to the knobs with various Time and Amplitude amounts.
When you’re done assigning click again on the ADSR Assign button and you’re ready to go.
In an example below I’ve assigned marked two breakpoints to an attack knob of the master envelope. Now with a turn of a single knob I’ve transformed my envelope to the shape you can see in the picture.
This is very useful not just for very extreme and complex envelope morphing but also for very subtle and controlled movements (one break-point can be assigned to various Master Envelope knobs with different amounts).
Now we know all that about envelopes (there are few other tricks I will be covering in my Sound Design Tutorial Series).
I believe this may be a bit confusing for a beginners but believe me it’s worth to learn how envelopes work in Absynth since they offer so many possibilities which cannot be found in any other synth.
It’s a bit overwhelming in the beginning but I assure your efforts will be greatly payed off.
And please, if you have any trouble understanding something or your not sure how something works, feel free to leave a question (or comment) below.

 YOUTUBE